See also: Adding an HTTPS listener, HTTP
Lobster Integration uses certificates in various places for encrypted communication. You can manage all certificates centrally here.
Go to: Administration > Partners > Certificates.
Note on the structure of this article
The sections Terms and concepts through Signing cover background knowledge on PKI and X.509. If you are already familiar with these concepts, skip ahead to Local certificates.
Terms and concepts
The terms in this section refer to Public Key Infrastructure (PKI). PKI is based on the X.509 standard of the International Telecommunication Union (ITU-T). This section assumes you are familiar with the following basic terms:
Asymmetric encryption
Public key, private key
Certificate, certificate authority (CA)
Fingerprint, signature
There are many freely accessible documents on the internet that introduce these topics.
Digital certificate
A digital certificate refers to an asymmetric key pair. It contains structured data. These data link the technical key to the identity of the owner. The owner can be a person, organization, company, or IT system. Every certificate contains a validity period and an address with the owner's details. An important part of this address is the Common Name (CN).
A certificate object includes a digital certificate and one or both keys.
Partner certificates
A partner certificate contains the digital certificate and only the public key. It does not contain the private key. The terms partner certificate and public key are often used synonymously.
Local certificates
A local certificate contains the digital certificate and both keys – the public key and the private key.
Certificate serial number
You typically install a partner certificate on the partner system. This certificate contains only the public key. You use it to uniquely assign the partner certificate to your own certificate. The certificate serial number serves this purpose. Lobster Data Platform/Integration displays this serial number uniformly as a decimal integer.
If an official certificate authority signs the certificate, systems verify its validity online. A private and a public key exist in this case too. You can safely exchange the partner certificate over the network. Never include the private key. The signing protects the partner certificate against manipulation. Send your partner the partner certificate, for example, by e-mail. They then use the fingerprint or checksum to verify that the certificate arrived unchanged.
Objectives of the X.509 technology
X.509 enables two security functions: data encryption and digital signing.
Each key pair is generated exactly once. The certificate information is permanently linked to it. Keys or descriptions can not be modified after creation. Data encrypted with one key can only be decrypted with the other key.
Only the certificate holder knows the private key. They share the public key with communication partners.
If the private key falls into the wrong hands, the integrity is broken. Manipulated data can no longer be decrypted. An attacker can intercept data. They cannot, however, decrypt, manipulate, and re-encrypt it. That would require both keys. Only the certificate holder has both.
Digital certificates therefore protect the confidentiality, authenticity, and integrity of data. This is especially important during transmission over the network.
Encryption
To transfer data securely to a partner, encrypt the data with the partner's public key. That is the partner certificate.
Only the partner can decrypt this data. They use their private key for this.
If the partner wants to send you encrypted data, they must encrypt it with your public key. Only you can then decrypt it with your private key.
The partner needs the public key. You can transfer it in two ways: As an exported local certificate by e-mail, or online during connection setup. Import the partner certificate you receive from the partner. The partner installs your exported certificate on their side as a partner certificate.
With a secure web server, clients receive the certificate and public key automatically. This happens during connection setup in the TLS handshake. The server does not need to know the clients in advance.
Signing
Signing is an additional encryption. When you send data both signed and encrypted, the process has two steps:
Encrypt the data with the partner's public key.
Create a hash (a checksum) of the data. Encrypt this hash with your private key. This is the signing.
First, the partner decrypts the signature using your public key. They verify the checksum. If it matches, they decrypt the data with their private key.
If you only send data signed, it travels in plaintext over the network. The signing only encrypts the hash – not the data itself. However, verifying the signature does confirm the sender's identity. Only the holder of the private key can correctly encrypt the checksum.
Self-signed or CA-certified?
When a CA certificate is required
In browser applications, many anonymous clients communicate with a server. For these applications, an official certificate authority (CA) certifies the certificate. The CA confirms that the server uses it legitimately.
Trustworthiness and validation
A certificate is considered trustworthy when a recognized CA, such as Let's Encrypt or DigiCert, has signed it. The client checks the certificate chain. Depending on the CA, it only checks the certificate itself. The goal is that the chain must lead to a root CA stored in the client's trust store.
A self-signed certificate or an incomplete certificate chain limits validation. The client cannot reliably verify the server's identity. Depending on the system, this leads to warnings or rejected connections. The client risks connecting to a wrong or manipulated system.
Also check that the hostname the client calls is stored in the certificate. The hostname must appear in the Subject Alternative Name (SAN) field or be correctly covered by wildcards. If the hostname does not match, TLS validation fails. In that case, the certificate cannot be confirmed as belonging to exactly this target system.
Self-signed certificates in B2B communication
In B2B communication (business-to-business), self-signed certificates are permitted. No third party is needed to certify authenticity between two business partners.
Every local certificate created in Local certificates is self-signed. It can, however, be certified. To achieve this, create a Certificate Signing Request (CSR) from the local certificate. Send this CSR file to a certificate authority. Open the certificate with a double-click (1).

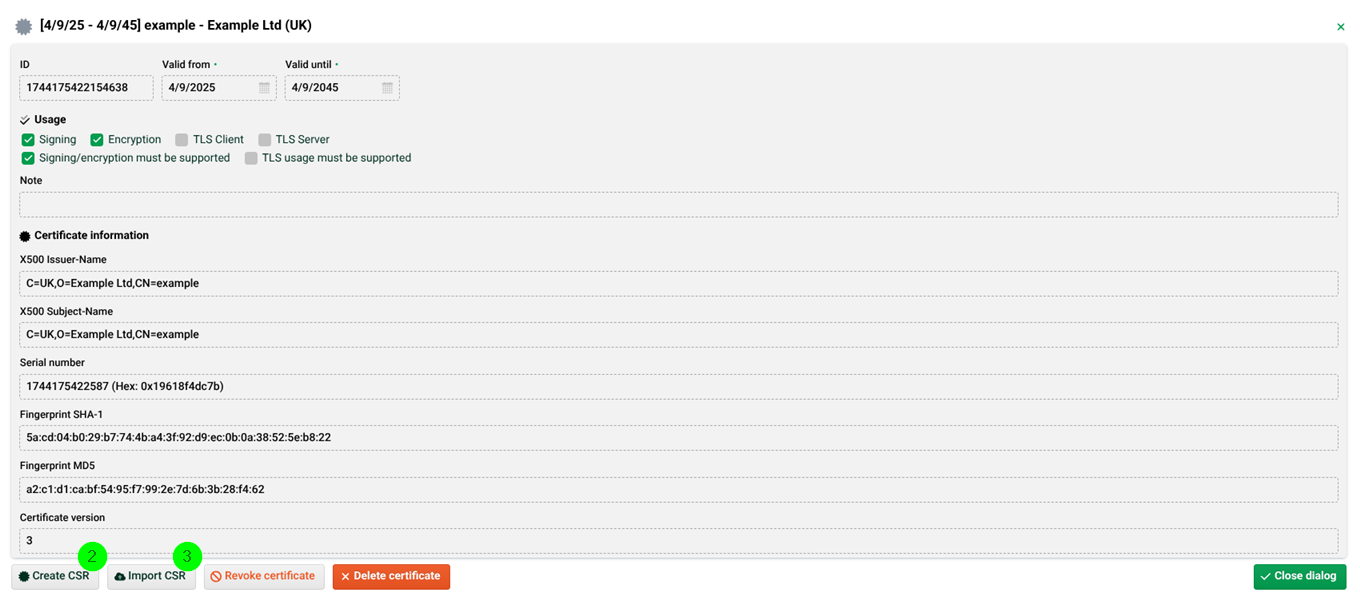
Click Create CSR (2). In a further dialog, copy the CSR and send it to the certificate authority.
Import the certificate authority's response (Certificate Signing Request Response) using Import CSR (3). Certification by a public CA is usually a paid service. For most Lobster Integration use cases, it is not required.
The order of the individual CSR components is:
CSR Response
Issuer
Root
If you only have the components separately, merge them in an editor in this order into a single file.
Exchanging a partner certificate
IMPORTANT
Only exchange the public key with your partners — never the private key. Certificates have a limited validity period; once expired, communication is no longer possible.
Format | Encoding | Import as | Notes |
|---|---|---|---|
.CER | CER-encoded (binary or Base64) | Local or partner | Exporting from Lobster Integration creates a zipped .CER file which contains only the public key. Also supports certificate chains. |
.CRT | DER (binary) or Base64 | Partner certificate | Common format on Linux/Unix systems. Can be either binary or Base64-encoded. |
.DER | DER (binary) | Partner certificate | Binary format; not human-readable. Contains only a single public key. |
.PEM | Base64 (text-based) | Partner certificate | Text file with a recognizable |
.P12/.PFX | PKCS#12 (binary, password-protected) | Local certificate | Contains private key + certificate in one file; for local certificates only. A password is required. NOTE An incorrect password triggers a misleading error: “No certificate included.” |
.P7B/.P7C | PKCS#7 | Partner certificate | Contains only public keys (no private key). Password errors trigger the same misleading message as P12. NOTE Special case: CSR response requires special handling. See box below. |
Special case: CSR response as .P7B / .P7C (from a Certificate Authority)
If a Certificate Authority (CA) returns a certificate response in .P7B or .P7C format, it cannot be imported directly. Instead, proceed as follows:
Open the .P7B file on Windows using the crypto shell extension.
Save all 3 parts of the certificate chain individually as Base64-encoded .PEM or .CER files (local certificate, intermediate CA, root CA).
Combine all three file contents in reverse order into a new .CER file, starting with the local certificate and the root CA last.
Import this .CER file as the certificate response for the certificate from which you created the CSR.
Notes on PEM format
The PEM format is a Base64 string between -----BEGIN CERTIFICATE----- and -----END CERTIFICATE-----.
WARNING
If the PEM file also contains a section from
-----BEGIN RSA PRIVATE KEY-----to-----END RSA PRIVATE KEY-----, that is the private key. This must never be shared.
Java Cryptography Extension (JCE)
Lobster Integration requires cryptography with unlimited key length. This policy is enabled by default from Java 8 Update 161 and therefore all newer Java versions. Manual installation of additional extensions is therefore no longer necessary.
If the required cryptography configuration is missing, the Integration Server does not start. The error message is:
The Java Virtual Machine can't handle strong cryptographyLocal certificates
Here you can create, import, export, view, and revoke local certificates. You can also generate a Certificate Signing Request (CSR). Use the context menu to create a CSV report. This report shows which channels use a certificate.
Find the certificate ID and the Common Name (CN) via (1). Do not confuse the ID with the serial number.

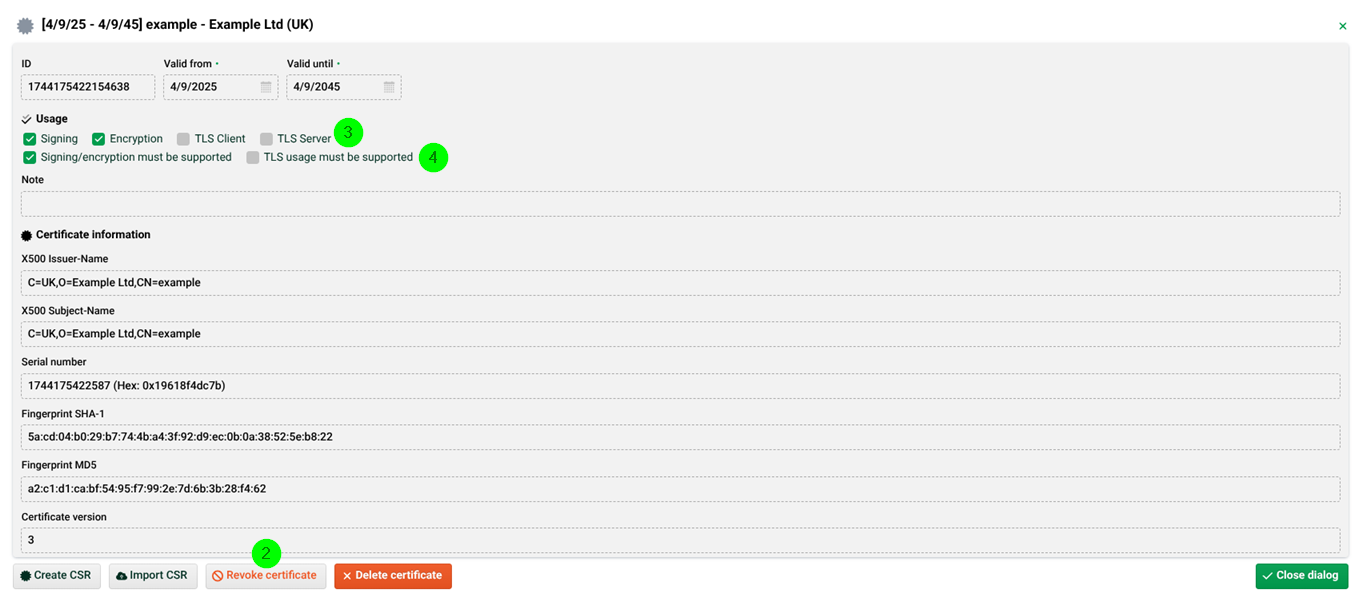
(1) and (2) Revoke certificate: Certificates become invalid automatically after their validity period expires. If you suspect a certificate is compromised before expiry, deactivate it locally via (1) and (2) using Revoke certificate. This requires admin rights. The certificate is not deleted. Deleting it would make encrypted or signed data unreadable.
IMPORTANT Revocation in Lobster Integration is merely a local deactivation of the certificate within the platform. No official entry is made in a Certificate Revocation List (CRL). This means:
A locally deactivated certificate can be reactivated at any time via (1). Locally deactivated certificates are hidden by default in the overview. Adjust the filter to display them.
If the certificate is also listed on an official CA CRL, local reactivation is technically possible. Communication partners that check the CRL will still reject the certificate, however.
(3) Usage (Signing, Encryption, TLS Client, TLS Server): Sets the usage flags – what the certificate can be used for.
(4) Usage (default must be supported): These checkboxes set the so-called critical flags for the settings in (3). They require your communication partner to check, when importing the certificate, whether they support the settings from (3). If they do not, they discard the certificate. Use the default settings shown in (4). This prevents the certificate from being rejected. These settings are correct for almost all cases. Only change them with good reason.
(5) Import certificate/SSH key: See "Importing a local certificate" and "Importing SSH key pair as a local certificate" sections below.
Let's Encrypt
See "Let's Encrypt/ACME/Certbot" section below to obtain and renew certificates from a certificate authority automatically and free of charge.
Creating local certificates
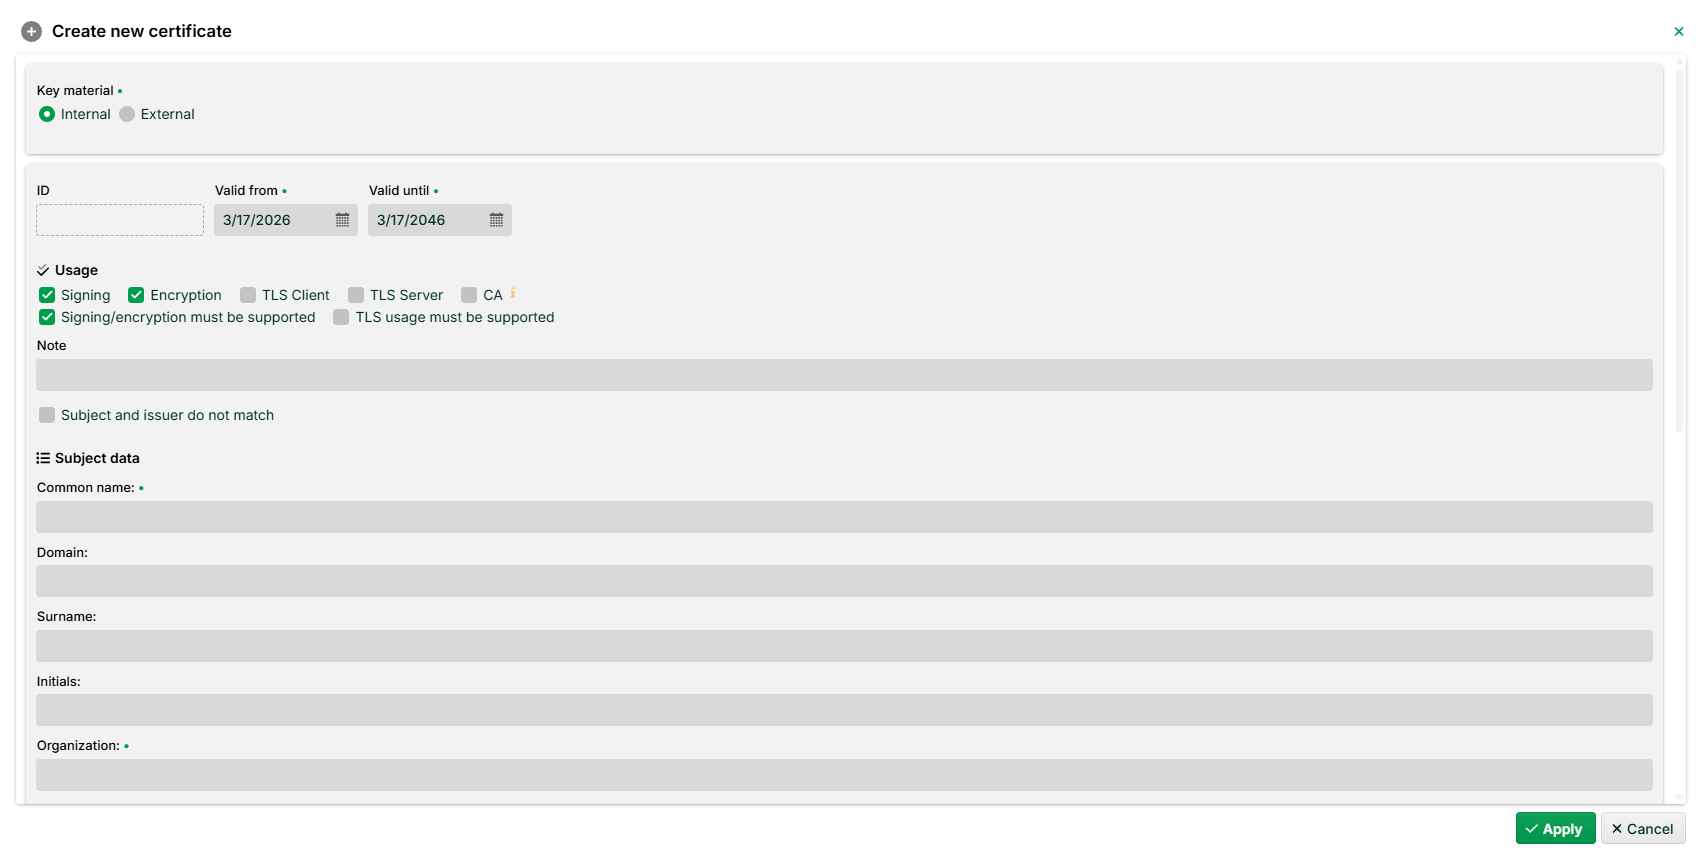
The following dialog appears after clicking the plus button at the bottom right (1). It shows the creation of self-signed certificates in the X.509 standard. See the X.509 standard for a description of the fields.
When creating a local certificate for OFTP2, you can also assign an ODETTE ID as a property.
.png)
NOTE Use the value "Internal" for the "Key material" option. This means it is a platform certificate and not from a vault.
Exporting a local certificate
Export a local certificate via the context menu. You can choose from several formats:
Certificate only
Private key only
Certificate and private key
IMPORTANT
If you send the certificate to a partner by e-mail, never export and include the private key. If you do, the certificate is compromised. Where possible, use the automatic Certificate exchange.
Create a secure backup of your local certificates and store it safely. This lets you restore certificates after a system failure. Creating a matching private key from an existing public key is not possible.
Importing a local certificate
Only import a local certificate if it was previously exported in full, including the private key. Typical situations include:
Transferring from a test system to a production or standby system.
Restoring after a system failure.
Importing a key from OpenSSH.
IMPORTANT
You will never receive a local certificate from a communication partner. If you do receive one, the certificate is compromised and must not be used.
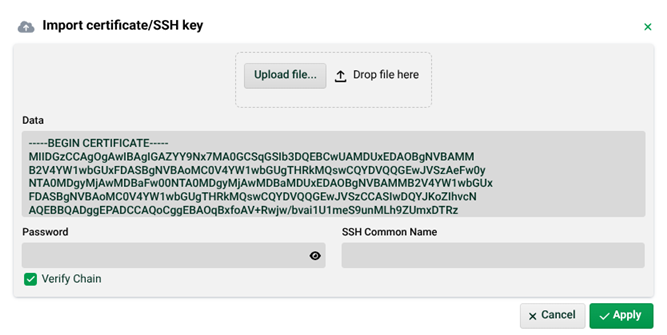
The following dialog shows the import dialog. Copy the certificate in PEM format into the text field, or drag a CER file directly into the dialog. If required, enter a password during import.
Importing SSH key pair as a local certificate
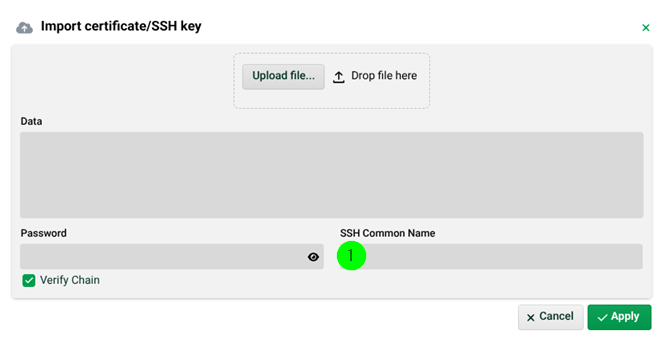
An OpenSSH key is not a complete certificate. It lacks an address assignment. Partner management only processes certificates with a name and address. When importing an SSH key, assign a name. Enter this name in the SSH Common Name (1) field. Lobster Integration generates a certificate from this. The SSH Common Name is entered as a Common Name (CN=...) in the certificate.
Let's Encrypt/ACME/Certbot
To access Lobster Integration via HTTPS, you need a certificate. See Adding an HTTPS listener.
Let's Encrypt (https://letsencrypt.org/docs/) is a free certificate authority (CA). Lobster Integration obtains certificates from Let's Encrypt automatically. They are also renewed automatically when they expire.
Lobster Integration uses the ACME protocol and the Certbot client internally for this purpose. The components are included by default. You only need to configure them.
Requirements
The CertificateExchangeService must be active (./etc/factory.xml, see there).

Configuration file ./etc/cex.xml must be adjusted (see below).
Lobster Integration must be publicly accessible (ports 80 and 443 must be open).
forceSSL must not be active. Otherwise no certificate can be generated. Adjust two files for this purpose:
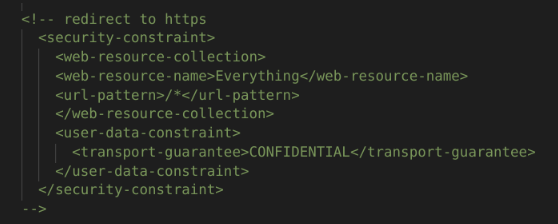
./etc/webdefault.xml – Wrap this part in a comment as shown.
./etc/startup.xml – Set the parameter to false.

Adjusting configuration file ./etc/cex.xml
From Lobster Integration 4.5 onwards, the configuration file already contains a prepared block for "Certbot" handlers. To activate it, change the NoCall tags to Call. Do not forget the closing tag. Otherwise the system will not start.
IMPORTANT You can copy the template below, but adjust all lines listed in the table. Otherwise authentication problems may occur.
Adjust the following parameters:
Parameter | Line in example | Description |
|---|---|---|
mailSenderAddress | 9 | E-mail sender address. |
handlerName | 22 | This name appears later in the notes of the certificate overview. |
accountContact | 32 | Contact e-mail address. Required by Let's Encrypt. Always specify this. |
addDomain | 55 | The public address of Lobster Integration. |
Optional:
Parameter | Line in example | Description |
|---|---|---|
certbotURL | 31 | Specify the staging environment here using |
<?xml version="1.0"  encoding="ISO-8859-1"?>
<!DOCTYPE Configure PUBLIC
 "-//Lobster//DTD Configure 1.0//EN"
 "http://www.lobster.de/dtd/configure_1_3.dtd">
<Configure class="com.ebd.hub.services.certexchange.CertificateExchangeService">

    <!-- Name of the DB alias to be used for internal data -->
    <Set name="dBAlias">hub</Set>
       <Set name="mailSenderAddress">mail@example.com</Set>
    <!--
        Certbot Handler configuration for the management of certificates
        that should be signed by an ACME supporting CA, e.g. Let's Encrypt
    -->
    <!-- Change NoCall to Call (don't forget the </NoCall> to enable this -->
    <Call name="addCertbotHandler">
        <Arg><New class="com.ebd.hub.services.certexchange.CertbotHandler">
            <!--
                Name of the handler. Certificates handled by this handler
                will have the name in the keystore notes and can be used
                as search term in TLS-configurations
            -->
            <Set name="handlerName">example.com</Set>
            <!--
                Used as contact for ACME-server account registrations
            -->
            <!--
                The URL of the ACME endpoint. The URL in this sample
                is the staging server, the URL of the production
                server is acme://letsencrypt.org
            -->
            <Set name="certbotURL">acme://letsencrypt.org/</Set>
            <Set name="accountContact">mailto:mail@example.com</Set>
            <!--
                Adds a certificate algorithm to be handled. This will
                lead to the creation of a keypair and finally a
                CA-signed certificate.
            -->
            <Call name="addCertificateAlgorithm">
                <!-- the non-EC algorithm -->
                <Arg>RSA</Arg>
                <!-- key size in bits -->
                <Arg type="int">2048</Arg>
            </Call>
            <Call name="addCertificateAlgorithm">
                <!-- the EC algorithm -->
                <Arg>ECDSA</Arg>
                <!-- the curve name -->
                <Arg type="String">secp256r1</Arg>
            </Call>
            <!--
                Adds a domain the certificate should contain as common name
                or alternate subject name.
            -->
            <Call name="addDomain">
                <Arg>example.com</Arg>
            </Call>
            <!--
                Number of days a certificate should be valid. This is part
                of the request to the CA and its support is CA-dependent. It
                might be ignored or denied, leading to an error. In that case
                setting it to 0 will omit adding it to the request
            -->
            <Set name="requestedCertificateValidityDays">0</Set>
            <!--
                (change NoSet to Set to activate this setting)
                Number of days before expiry a renewal request should be
                sent to the CA
            -->
            <Set name="daysBeforeExpireRefresh">10</Set>
        </New></Arg>
    </Call>

</Configure>
Enabling HTTPS listener/Specifying a certificate
After the Integration Server restarts, the newly generated certificates appear in the certificate overview (local certificates) after a few minutes. They are marked with a note – the handler name.
To use the new Let's Encrypt certificate, enable the HTTPS listener and adjust ./etc/hub.xml. See the following example:

IMPORTANT
Both the CN (Common Name) and the ksnote prefix can be used. The latter acts as an alias and uses the certificate note as a unique reference.
Usage on a DMZ server
A DMZ server is in most cases the interface to or from the outside. "Certbot" must be installed there. In addition to the standard changes to ./etc/factory.xml, ./etc/cex.xml, and ./etc/hub.xml as described above, adjust the following.
./etc/cex.xml: The parameter dBAlias must have the value: dmzcommauth.
![]()
./etc/auth_dmz.xml: The parameter <Set name="localDbFile">dmz/hsql/cacheHsql</Set> must not be active and must be commented out.
Error handling
If errors occur, check the following logs.
./logs/console.txt
If Lobster Integration no longer starts, this is usually caused by faulty configuration files. Check ./etc/cex.xml, ./etc/hub.xml, and ./etc/factory.xml.
./logs/services/message.log
Search for CERTBOTHANDLER to narrow down results. This gives a rough overview of whether a CSR was successful.
./logs/services/error.log
If authentication fails, the details are here.
Partner certificates
Find the certificate ID and the Common Name (CN) by double-clicking the certificate. Do not confuse the ID with the serial number.

A partner certificate contains only your communication partner's public key and the certificate that assigns the validity period and owner information to the key. You typically receive a partner certificate from your partner, for example by e-mail in .pem format or as a file.
Partner certificates can be managed (imported, viewed, and revoked) here.
NOTE Partner certificates cannot be created. Your partner must export their certificate with their public key and provide it to you. Each partner certificate is assigned to a specific partner and can only be used for their channels. Since partner certificates contain only the public key and no private key, you can pass them on without hesitation. However, you cannot import a partner certificate as a local certificate.
Importing partner certificates
Click the Import certificate/SSH key button (1). You can then either copy the contents of a certificate file in .pem format directly into the window, or drag and drop a .cer file into the window.

Authentication by client certificate
As a precondition, an HTTPS listener must be defined in the configuration file ./etc/hub.xml.
The protocols HTTPS, AS2 over HTTPS, and OFTP2.0 over TLS use the SSL or TLS protocol on the transport layer to establish a secure channel through encryption. Usernames and passwords sent within this channel are much better protected against interception than they would be via a plain text channel (e.g. HTTP). However, this security may not be sufficient for a communication partner. They might therefore require the client to be identified with a certificate – in addition to, or instead of, a password. This certificate is called a client certificate because it proves the identity of the client, not the server or service. It is a local certificate on the client side. Only the client can access the private key.
Lobster Integration supports client certificates for HTTPS, AS2, and OFTP if the communication partner requests authentication with a client certificate. You can also require the partner to log on with their client certificate. See the Local certificates section.
A special case is OFTP via TLS. The specification requires mutual partner identification via certificate. This certificate is therefore simultaneously a server and client certificate, depending on the direction of the connection setup. For outbound connections, it is the client certificate.
For all outgoing connections using AS2 via HTTPS, OFTP via TLS, and HTTPS, the client certificate is the local certificate assigned to the partner channel. It is the same certificate used to sign messages and files. With AS2, separate certificates can be used for encryption and signing.
Authentication by client certificate is only possible through a partner channel. A response without a partner channel cannot be used for this.
See also: HTTPS client.
Vault certificates
You can use a vault provider to store your certificates (local certificates and partner certificates) and use them in your Lobster Data Platform.
Azure
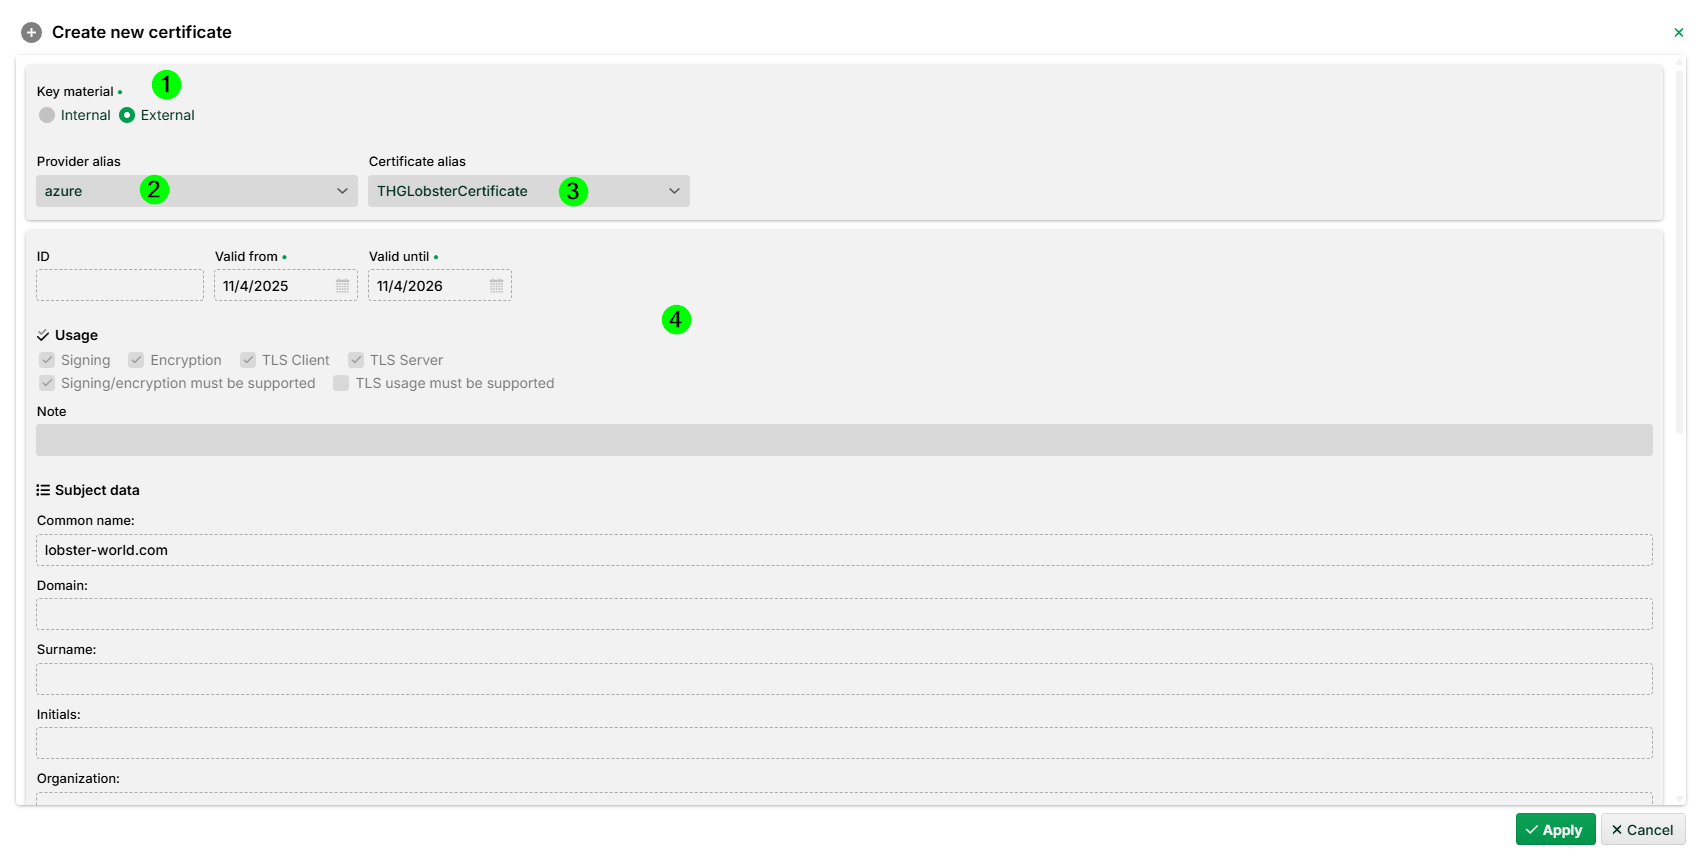
(1) Select the value "External". NOTE This means it is a vault certificate and not a platform certificate.
(2) Choose your vault provider alias.
(3) Choose the certificate alias.
(4) Those fields are read-only and are set automatically.
HashiCorp
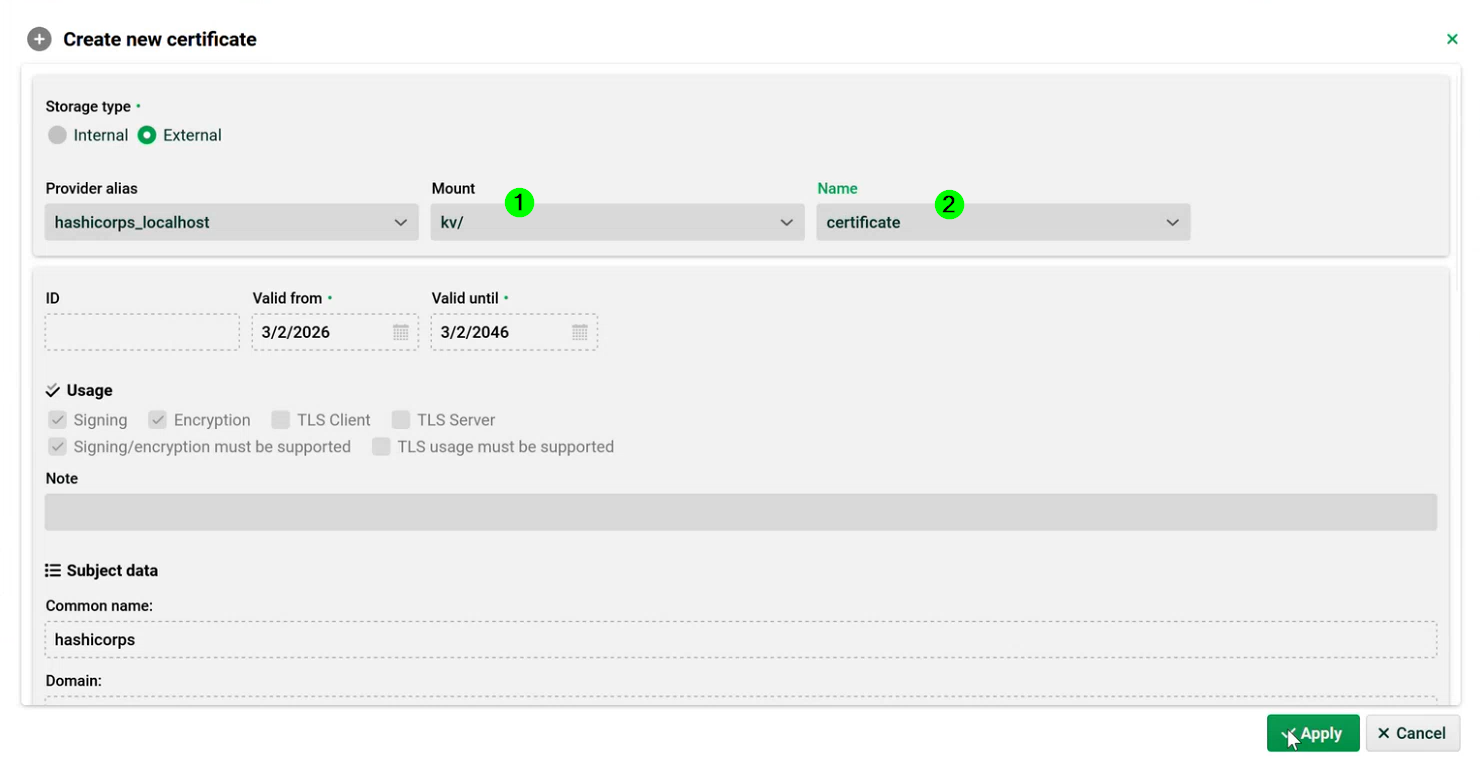
HashiCorp works the same way, but requires two additional fields. Mount (1) is the path where a secrets engine is enabled. Think of it as the "root namespace" or "drive letter" for a category of secrets. Name (2) (sometimes called the path within a mount) is the specific identifier for an individual secret within the mount. See your HashiCorp documentation for details.