Here you can manage your database connections (aliases). In addition, you will find licensed Business Connectors here (plug icon). Use the context menu to create, edit or delete entries.
IMPORTANT Databases and JDBC drivers used to access databases are third-party products and are neither supported nor provided by Lobster. Any support or advice on databases or JDBC drivers that may nevertheless be provided by the Lobster support is voluntary and in no way implies a transfer of responsibility to them. The installation, operation and maintenance of databases/JDBC drivers, or measures carried out on them, are always and without exception the responsibility of the customer. The Lobster support will of course be happy to assist you with the internal configurations necessary to connect functioning third-party systems.
Overview

(1) Manage drivers: Opens a dialog for managing the database drivers under ./extlib. NOTE Please upload JDBC drivers only as .jar files. Afterwards a restart of the Integration Server is necessary. To check whether the driver has been loaded correctly, you can search for the name of your .jar file in file./logs/wrapper.log (Windows) or ./logs/console.txt (Linux).
(2) Business Connector: Selection of a Business Connector (Input Agent cron). Please contact information@lobster.de. NOTE See also section Update Center.
(3) Column left: Indicates whether it is a classic database connection (as you know it) or a Business Connector (plug symbol). You can recognize the database for Lobster Integration itself by the green icon.
Context menu
Edit | Self-explanatory. |
Connection test | See section below. |
Create copy | Self-explanatory. |
Delete | Self-explanatory. |
Export | Export of an entry as text file (without password). |
Import | Import of a previously exported entry. |
New connection | See section below. |
Creating new database connection
You can create a new database connection via the plus symbol at the bottom right or via the context menu. Connections that you create here no longer have to be maintained in the configuration file ./etc/database.xml, you can work exclusively in the GUI. In addition, no restart of the Integration Server is necessary, only for newly uploaded drivers (see above). See also: DatabaseService.
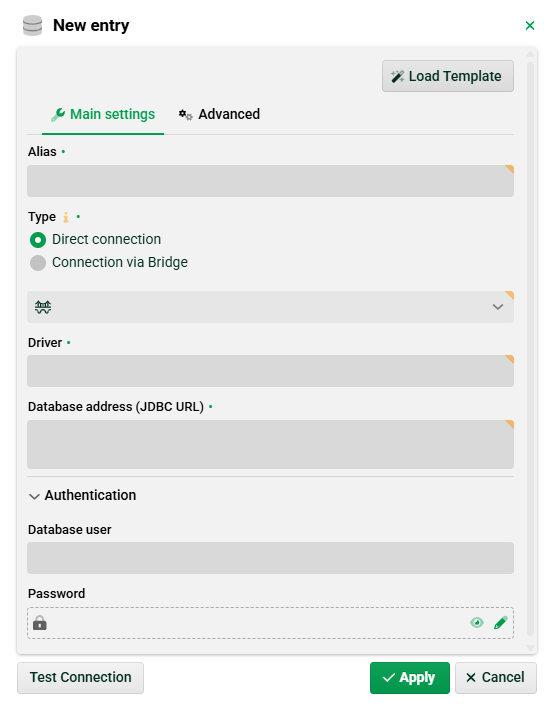
(4) Load template: Here you can select pre-configured connection templates. NOTE You can obtain the latest templates via the Update Center.
On the left, you will find classic database connections. Replace the placeholders DB_HOST_OR_IP and DB_NAME with your specific values. If required, fill in missing fields and JDBC properties such as Catalog Name, User, Password, etc.
On the right, you will find Connectors.
(5) Type: Usually, you would choose a direct connection here. For connections via Bridge, see section Bridge.
(6) Driver: JDBC driver class used to connect to the database, e.g. org.gjt.mm.mysql.Driver
(7) Database address: Full JDBC string that represents the connection to the database, e.g. jdbc:mysql://myserver:3306/db
(8) Database user: Specify your database user.
(9) Password: Enter your password here. For Vault passwords see the Vault provider configuration section.
Connection test
You can perform a connection test via the context menu of a selected connection. A standard SQL query is executed in the background. You will receive a simple success or error message as feedback. NOTE For CData connections, you must enter a suitable SQL query yourself.
See also the following section.
Database access via GUI tools
Plugin SQL console.
Admin Console → SQL monitor.
Database access in Input Agents in Phase 1
Business Connector (Input Agent cron) (paid connectors and classes DefaultFileSQLCron, DefaultSQLCron, CrossSQLCron)
Database access via functions in Phase 3
select into map(a,b,[param &1 = c], d,e, f,g,h,i,j], delimiter k, map l,m,n,o,p)
select into map(a,b,list name c, delimiter d, map e,f,g,h,i)
select-statement a [[param &1 = c], d,e, f,g,h,i,j], default k,l,m,n dbAlias = b
call db procedure a, alias b, [c,d,e,f,g,h,i,j],k,l,m,[n],o,[p]
Relevant system variables
VAR_SYS_EXCEPTION_STACKTRACE
VAR_SYS_HAS_SQL_ERROR
Database access in Phase 4
See section Phase 4.