This article describes the REST API class (RestApi) within the API entity type (RestApiDefinition). Through the API field (api), the class binds endpoints for a custom REST API that the Lobster Data Platform server provides.
The REST API Definition entity type (RestApiDefinition) can alternatively be used for MCP tools. In that case, the MCP Server class (McpRestApi) is used instead of the REST API class. For details, see MCP Server.
The common starting point for managing all RestApiDefinition instances is the menu entry API Manager. It contains shared details for all definitions.
The detail window (de.lobster.scm.api::RestApiDefinition|detailsWindow) contains two tabs with content specific to the REST API class:
API (available for REST API and MCP Server)
Meta information (REST API only)
Further topics
Due to the scope, details are split across the following sub-topics:
REST API: URI and URI parameters: URI format, URI parameters with separators, dynamic paths via regular expressions.
REST API: Client object input type (ASObject): Client object structure, Aerodrome example, HTML form data.
REST API: Advanced endpoint settings: Anonymous access, sunset, policy settings, OpenAPI error codes.
REST API: Action block context: Declared variables, return value, anonymous vs. authorized access.
REST API: Meta information and versioning:
RestApiMetadatastructure, versioning approaches.
API tab
Header area
The header area contains elements not tied to a specific endpoint.
In the Text field for the base URI property (baseUri), you enter the common base address for all endpoints of the REST API instance.
The Show OpenAPI documentation link opens a new browser tab. There, you see an auto-generated Swagger documentation for all endpoint configurations under this base URI.
The OpenAPI documentation only includes the saved state of all active REST API definitions under the same base URI. Endpoint definitions from inactive REST API definitions do not appear.
If multiple active REST API definitions provide endpoint definitions for the same endpoint URI (uri), their priority value determines which one applies. For details, see API Manager. The OpenAPI documentation shows only the effectively active endpoint. Which REST API definition provides the endpoint is not visible in the documentation.
Endpoints list
Below the header area, a Data grid element on the left half of the detail area shows all configured endpoints.
For a new REST API, the list is empty.
The buttons to the right of the list let you add an endpoint () or remove the displayed endpoint ().
Clicking a row selects a list entry. The detail area then shows the corresponding data.
When you first open the tab, no entry is selected. The detail area remains empty.
Clicking an already selected entry deselects it. The detail area then shows no data.
While the list has focus, you can also navigate with the cursor keys (↑↓). The selected entry appears in the primary color. For details on the primary color, see Styles.
The list can be filtered and sorted. These settings only apply while the detail window is open. The platform does not save them.
The context menu in the top right of the list provides the following functions for data grids (details: Data grid):
Change column visibility
Reset list settings
Export list
NOTE The list does not retain column and filter configurations. Consequently, resetting has no operational impact.
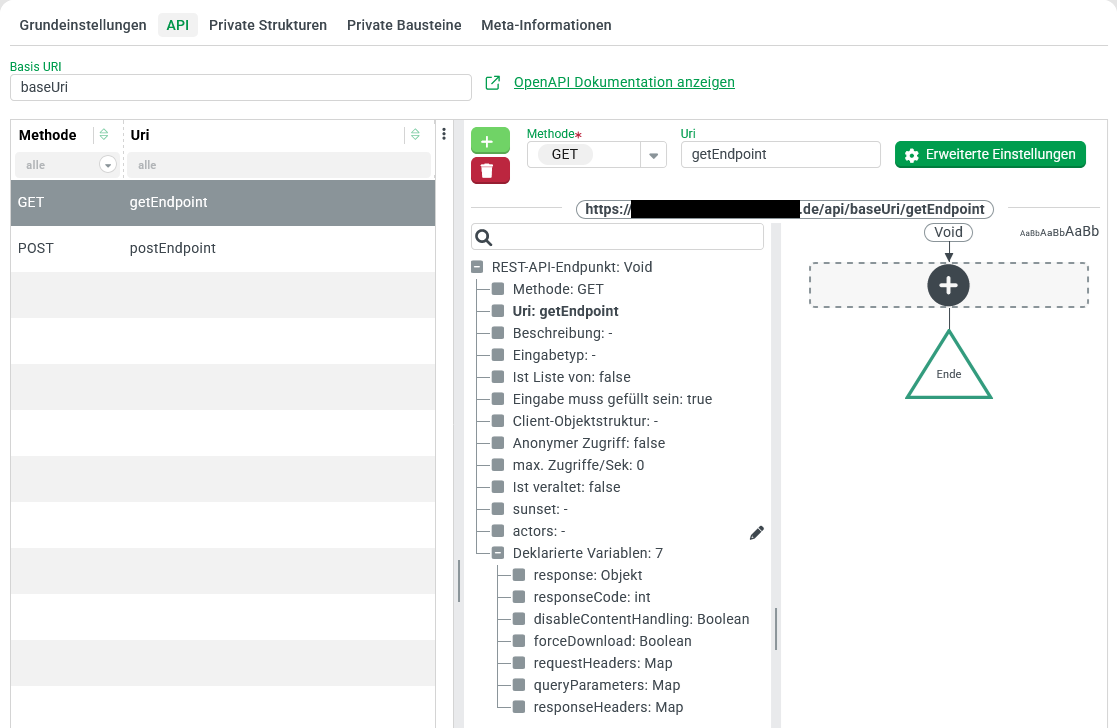
Endpoint detail area
To the right of the endpoints list, the detail area shows the data of the selected endpoint.
The header of the detail area contains the add and remove buttons mentioned earlier, plus Form elements for direct access to properties (Method, URI) and an Button Advanced settings for indirect access via a dialog.
NOTE Depending on the selection, form elements appear or disappear. When they disappear, the entered data is lost.

The Combobox element for input type only appears depending on the selected Method. For the HTTP methods GET and DELETE, the platform does not expect an input value. The input type selection then does not appear.
The Check box Is collection of appears as soon as you select an input type. If active, the platform expects an input value as a list of entries of the selected type.
For the input type "client object" (ASObject), the Button Client object structure also appears. For details, see REST API: Client object input type (ASObject).
The Button Advanced settings opens a dialog with additional settings. For details, see REST API: Advanced endpoint settings.
Via the Button Assign, you optionally bind Association criteria to the endpoint. This controls availability via conditions such as Role rule or Company rule. For details, see Access control for APIs.
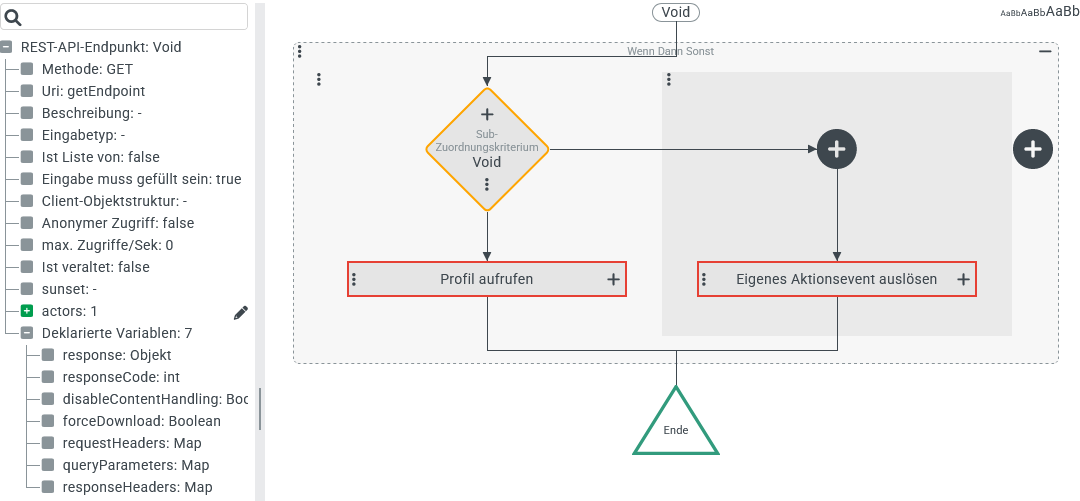
The main window of the detail area is split vertically into two areas:
On the left, a tree view shows the data structure of the selected REST API endpoint object (
RestApiEndpoint). A Declared variables node also appears. For details, see REST API: Action block context.To the right, you build an action block for the endpoint's event handling from Event actions. For details, see Configuration of events.
NOTE At the boundary between header and main window, the platform shows the endpoint URL with the following schema: <platform-url>/api/<baseUri>/<uri>

<platform-url>: URL of the current client session.<baseUri>: substring from the base URI property (baseUri) of the REST API class. Applies uniformly to all endpoints of the REST API.<uri>: substring from the URI property (uri) of the REST API endpoint class. Specific to each endpoint.
CAUTION Avoid having the string mcp/ immediately follow the predefined literal /api/ in the overall URI. Otherwise, conflicts can occur between the definitions for MCP Server and REST API.
Method (method)
The following HTTP methods are available:
Method | Input value ( | Typical REST action |
|---|---|---|
| No | Read |
| Yes | Create |
| Yes | Update |
| Yes | Update (partial) |
| No | Check existence (without reading details) |
| No | Delete |
URI (uri)
The URI property identifies the endpoint via a static string. Optionally, this string can be a path separated by slashes (/). Variable parts are specified as URI parameters.
For details on URI parameters, separators, dynamic paths, and examples, see REST API: URI and URI parameters.
Input type (inputValueType, isCollectionOf, clientStructure)
The Combobox element for input type (inputValueType) only appears when the Method (method) requires an input value. This applies to the methods POST, PUT, and PATCH.
The dropdown contains data types of various categories: simple values such as Boolean, complex data objects such as DateRange, concrete entity types, parent classes, and interfaces.
The selection is optional. Without a selection, the platform uses the unspecific data type Object (Object).
Activate the Check box Is collection of (
isCollectionOf) when the input value should be a list of entries of the selected input type.For a list of entries with an arbitrary input type, select the type Object (
Object) and activate Is collection of.Alternatively, select the type List (
java.util.List) or Unique list (java.util.Set) without Is collection of.With
Set, the entries do not need to be unique. However, the platform removes duplicates in the action block. The order of values may differ from the input value.When the input type is not a concrete type but, for example, an interface such as Interface > User (
IUser), the platform checks whether a compatible class is present in the response body.If the class declared in the response body (
class) is incompatible with the input type, the platform responds with HTTP error404 Error: Not Found.
Special input type: Content
When you select the type Content (Content) as the input type, the platform does not automatically deserialize the input value. Instead, it creates a data object of type Content.
The
bodyfield contains the payload from the request.The
mediaTypefield receives the value of theContent-Typeheader.The
namefield remains empty.
This is how you process a binary file or parse custom XML in the action block, for example. See Parse XML.
Special input type: client object (ASObject)
When you select the type Client object (ASObject) as the input type, you define a Client object structure reference in the clientStructure field via the client object structure.
For details, examples, and the handling of HTML form data, see REST API: Client object input type (ASObject).